
Learn to design DIY Coding Cards that teach kids sequencing, algorithms, and critical thinking through fun, hands-on activities.
Sequencing is the heart of every computer program, yet it’s a skill that extends far beyond screens and keyboards. By crafting DIY coding cards, you can transform abstract concepts into tangible, playful exercises that help children grasp the logic of step-by-step instructions. In this comprehensive guide, you’ll discover how to design, build, and implement your own coding cards to teach sequencing like a pro. From defining commands and creating instructional mats to advanced challenges and curriculum integration, we cover every aspect you need to create an engaging, educational, and screen-free coding experience.
Why Sequencing Is the Foundation of Computational Thinking
At its core, sequencing is ordering tasks so they produce the desired outcome. Think about making a sandwich: you can’t spread peanut butter before opening the bread, and you wouldn’t spread jelly on an empty knife. In programming, the same principle applies—computers execute instructions in the precise order they receive. Teaching kids sequencing builds:
- Logical flow: Understanding cause and effect in ordered steps
- Problem decomposition: Breaking complex tasks into manageable actions
- Predictive reasoning: Anticipating results before execution
- Error detection: Spotting out-of-order steps and correcting them
By empowering children with sequencing skills, you set the stage for learning loops, conditionals, functions, and other advanced programming constructs. And with DIY coding cards, they get a tactile, memorable introduction to these fundamentals.
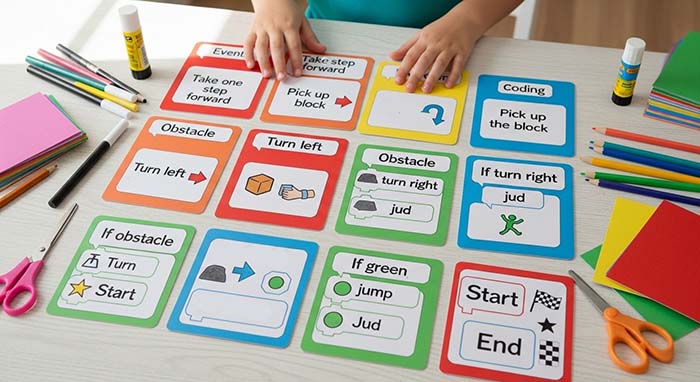
What Are DIY Coding Cards?
DIY coding cards are homemade instructional cards representing single programming commands or actions. Each card features an icon, keyword, or short phrase—“Move Forward,” “Turn Left,” “Start Loop,” or “If/Then”—that kids can arrange in sequence to form an algorithm. When executed, the cards guide a toy, a peer, or the child themselves through a series of steps, turning playtime into an active coding lesson. Key characteristics include:
- Customizable commands based on age and skill level
- Color-coded categories for quick recognition
- Durable materials for repeated use
- Printable templates for easy duplication
These cards bridge the gap between tangible activities and digital coding, offering children an off-screen pathway to computational thinking.
Materials You’ll Need
Before diving in, gather the following supplies:
- Blank index cards or heavy cardstock
- Markers, colored pens, or pencils
- Ruler (for straight edges)
- Stickers or printed icons (optional)
- Laminator or clear tape (for durability)
- Instruction mat (grid or plain paper)
- Small toys or figurines for execution
With minimal supplies, you transform your home or classroom into an interactive coding lab.
Designing Your First Deck of Coding Cards
1. Define Core Commands
Start simple. Identify 6–8 essential actions:
- Move Forward
- Move Backward
- Turn Left
- Turn Right
- Pick Up
- Put Down
Each command becomes a card. Write the action in bold, add a matching icon, and color-code the border. For movement, you might use blue; for object interactions, green.
2. Introduce Control Structures
Next, add cards for control flow:
- Loop Start – Indicates the beginning of a repeat block.
- Loop End – Marks the loop’s conclusion.
- If/Then – Conditional execution
- Else – Alternative path
- End If – Closes the conditional
These cards teach children to avoid writing repetitive instructions, emphasizing efficiency.
3. Add Advanced Constructs
For older or more experienced learners, include:
- Function Definition – Groups a sequence into a reusable block
- Function Call – Executes a predefined routine.
- Wait – Pauses execution for a set number of seconds.
- Repeat Until – Continues a loop until a condition is met.
This progression mimics the learning path of professional coders.
4. Visual Design and Durability
Neat visuals boost engagement. Use contrasting colors, clear icons, and legible text. Laminate cards or wrap them in clear tape to withstand classroom handling and outdoor play.
Building Your Instruction Mat
An instruction mat provides structure for card sequences. Create a grid with 10 columns and 3 rows, or draw a simple arrow-shaped path. Kids place cards left-to-right, top-to-bottom, reading like a program. The mat helps visualize flow and simplifies debugging when commands fail.
Core Activities to Teach Sequencing
Activity A: Robot Relay
Pair children. Player A arranges 5–8 command cards on the mat to guide a toy robot from start to finish. Player B executes the sequence exactly. If the robot fails, the pair discusses and debugs the card order.
Activity B: Debug the Shuffle
Provide a correct sequence of cards, then swap two steps or remove one. Challenge kids to identify and fix the bug. This sharpens their ability to spot out-of-order instructions.
Activity C: Loop Introduction
Using Loop Start/Loop End cards, show how to repeat a set of moves. For example: Loop Start → Move Forward → Turn Right → Loop End (×3). Kids see firsthand how loops replace repetitive cards.
Activity D: Conditional Quest
Place an obstacle on the mat. Include If/Then/Else cards. For example: If path blocked → Turn Left, Else → Move Forward. Kids write sequences that adapt based on conditions, learning branching logic.
Activity E: Story Sequencing
Combine coding cards with story cards illustrating a daily routine (wake up, brush teeth, eat breakfast). Kids arrange both narrative and command cards to practice sequencing in multiple contexts.
Advanced Sequencing Challenges
Once core skills are solid, introduce high-level tasks:
Nested Loops: Teach a loop within a loop. E.g., Loop Start → Move Forward → Turn Right → Loop End → Repeat Outer Loop.
Function Building: Show how to encapsulate a sequence of cards into a “macro.” Draw a bracket around Move Forward/Turn Left/Move Forward and label it “Spin Move.” Then use a single Function Call card to invoke the bracketed routine.
Timed Code Race: Set a two-minute timer. Who can sequence and execute a 10-card program fastest with zero errors? Add fun penalties for mistakes—20-second resets or drawing a surprise action.
How DIY Coding Cards Build Real-World Skills
| Skill | Application through Cards |
|---|---|
| Sequencing | Ordering cards to form correct algorithms |
| Abstraction | Grouping steps into functions or macros |
| Conditional Logic | Using If/Then/Else to branch card paths |
| Looping | Repetitive actions replaced by Loop Start/Loop End |
| Debugging | Spotting misplaced, missing, or swapped cards |
| Collaboration & Communication | Peer review in Robot Relay and Group Debugging |
| Critical Thinking | Designing efficient, clear sequences |
| Creative Expression | Custom icons, story integration, thematic variations |
These are the same capabilities coders use daily—but kids develop them through play and experimentation.
Integrating DIY Coding Cards into Curriculum
Week 1: Sequencing Basics
- Lesson: Introduce Move/Turn cards; practice 3-step sequences.
- Activity: Robot Relay.
- Assessment: Students write down and execute sequences on worksheets.
Week 2: Loop Fundamentals
- Lesson: Explain repetition; demonstrate Loop cards.
- Activity: Create a Loop Dance routine.
- Assessment: Each student programs a looped sequence for a partner.
Week 3: Conditional Learning
- Lesson: Teach If/Then/Else logic with real-life examples.
- Activity: Obstacle Course coding.
- Assessment: Students design conditional sequences and test in groups.
Week 4: Functions and Abstraction
- Lesson: Define functions; show code reuse.
- Activity: Function Relay—teams build and call routines.
- Assessment: Students submit flowcharts and corresponding card sequences.
Week 5: Debugging Workshop
- Lesson: Common sequencing errors and debugging strategies.
- Activity: Debug the Shuffle pairs challenge.
- Assessment: Students create their own buggy sequences for peers to fix.
By pacing lessons and assessments, educators can scaffold learning from simple to complex, ensuring mastery at each step.
Classroom Management and Differentiation
Differentiation Tips
- For younger learners (ages 5–7), focus on basic moves and single loops.
- For intermediate groups (ages 8–10), introduce conditionals and nested loops.
- For advanced students (ages 11+), add functions, variables, and timers.
Group Dynamics
- Pair programming fosters peer learning and shared debugging.
- Small teams of 3–4 encourage collaboration and division of roles (designer, executor, debugger).
- Rotate leadership roles so each child practices sequencing, execution, and debugging.
Keeping Engagement High
- Theme the cards: pirate treasure hunt, space mission, enchanted forest.
- Use stickers and rewards for correct sequences.
- Host a “Coding Card Fair” where groups present their decks and demonstrate solutions.
Printable Templates and Extensions
Offer families and teachers free downloadable resources:
- Blank card templates with pre-printed icons
- Themed instruction mats (grid, winding path, obstacle courses)
- Challenge worksheets for each activity
- Reflection journals for documenting debugging strategies
Encourage the community to share custom themes—underwater adventure, medieval quest, city traffic simulation—to keep the fun fresh and relevant.
Tips for Success
- Start Small: Introduce 3–5 commands before expanding the deck.
- Visual Clarity: Use large icons and bold text for easy readability.
- Celebrate Errors: Frame mistakes as learning moments—debugging builds resilience.
- Encourage Creativity: Let kids invent new cards (e.g., “Spin & Clap,” “Hop Twice”).
- Connect to Digital: After mastering cards, translate sequences into Scratch or Python scripts.
- Document Progress: Use simple flowcharts or code journals to track design and debugging steps.
- Keep Materials Handy: Store decks and mats in a labeled box for spontaneous coding play.
Real-World Success Stories
Case Study: Downtown Elementary
Ms. Rivera’s third-grade class adopted DIY coding cards as part of their weekly STEM lab. After two months, students showed a 40% increase in problem-solving scores and greater confidence in group projects. Parents reported children explaining sequencing logic during daily routines—proof that coding concepts had become a part of life beyond school.
Parent Testimonial
“During breakfast, my eight-year-old insisted on sequencing pancake steps with her coding cards. It was hilarious and amazing to see her apply loops to speed up the process—she’s definitely thinking like a coder now!” —Alex, parent in Seattle.
Beyond Cards: Integrating Technology
While DIY coding cards shine as a screen-free tool, bridging to digital platforms enhances learning. After practicing with cards:
- Transition to block-based environments like Scratch, translating handwritten sequences into drag-and-drop code.
- Use micro:bit devices to execute simple programs that mimic card sequences (e.g., move motor forward, turn LED left).
- Explore robotics kits (LEGO Education SPIKE Prime, Sphero) to visualize commands in physical movement.
This hybrid approach leverages the tactile foundation of cards with the interactivity of technology, solidifying understanding.
Conclusion: From Card Decks to Coding Confidence
By crafting your own DIY coding cards, you provide children with a dynamic, hands-on introduction to sequencing—the very backbone of programming logic. These cards transform abstract algorithms into manipulatives that kids can touch, arrange, debug, and celebrate. Whether in the classroom or at home, this approach fosters collaboration, critical thinking, and a growth mindset. Sequencing learned through play lays a robust foundation for loops, conditionals, functions, and beyond. So gather your markers and cardstock, design your deck, and watch young learners sequence their way to becoming coding pros—one card at a time.

I’m a longtime enthusiast of creative play and creative magic. I’m passionate about transforming everyday materials into extraordinary fun. I explore, test, and refine each project, ensuring it sparks joy, fuels imagination, and is delightfully achievable for families and educators. Driven by the belief that the best toys often come from imagination. I love empowering others to create playful memories.