
Learn how to craft a beautiful Japanese Kokeshi Doll from recycled materials with this step-by-step, eco-friendly DIY tutorial.
Making a Japanese Kokeshi Doll from recycled materials combines eco-conscious creativity with centuries-old craftsmanship. Imagine transforming everyday trash—like an empty roll-on bottle or cardboard tube—into a charming, culturally rich keepsake. Not only do you reduce waste, but you also introduce yourself or your children to the elegant simplicity of traditional Japanese folk art. This project isn’t just about crafting; it’s about storytelling, sustainability, and hands-on learning that bridges the gap between cultures and generations.
In this guide, we’ll explore the origins of Kokeshi dolls, list all the tools and materials (mostly found at home), and walk you through every detail—from shaping the head to painting the signature floral motifs. Whether you’re a seasoned crafter or a curious beginner, you’ll end up with a one-of-a-kind doll that’s as meaningful as it is beautiful. Ready to dive into the world of Kokeshi Doll DIY? Roll up your sleeves—our workshop awaits.
Understanding the Tradition Behind Kokeshi Dolls
Kokeshi dolls originated over 150 years ago in the Tōhoku region of northern Japan. Craftsmen in hot spring towns like Naruko and Tsuchiyu carved these simple wooden dolls as souvenirs for visitors. With their cylindrical bodies and round heads, Kokeshi dolls reflect minimalist beauty—no arms or legs, just pure form and hand-painted patterns. Over time, regional styles emerged: Naruko Kokeshi feature elegant collars and chrysanthemum patterns, while Tsuchiyu Kokeshi often exhibit bold stripes and geometric designs.
Each doll carries a story. In some villages, wood was felled in autumn and left to dry under snow, creating unique grain patterns. Craftsmen developed specialized tools and techniques—like hamekomi, an inlay method that joins head and body seamlessly using frictional heat. Today, Kokeshi dolls symbolize friendship, healing, and good fortune. By making your own Japanese Kokeshi Doll, you honor this heritage while adding a sustainable twist: repurposing household items instead of wood.
Gathering Tools and Recycled Materials
Creating an eco-friendly Kokeshi Doll doesn’t require a trip to the craft store. Most supplies come from what you already have:
| Material | Purpose |
|---|---|
| Empty roll-on deodorant bottle | Body base |
| Plastic half-golf ball or wooden bead | Head shape |
| Air-dry clay or paper-mâché paste | Sculpting nose, ears, and smoothing gaps |
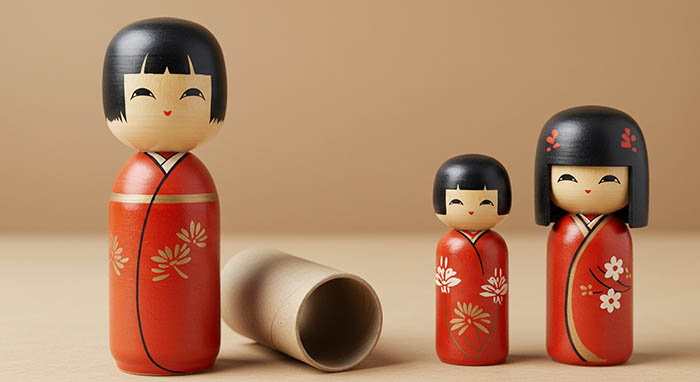
| Cardboard tube (optional) | Alternative body base |
| Acrylic paints (white, red, black, floral colors) | Painting the face and kimono patterns |
| Fine paintbrushes (size 0 and 2) | Detail work on facial features and motifs |
| Masking tape and sandpaper | Smoothing surfaces and securing pieces |
| Glue gun or strong craft glue | Assembling head, body, and decorative pieces |
| Varnish or clear sealant spray | Protecting paint and adding shine |
Optional: scrap fabric for kimono accents, beads or threads for hair accessories, and colored paper for obi belts.
Preparing and Cleaning Your Recycled Base
Start by cleaning your empty roll-on bottle or cardboard tube thoroughly. Remove labels, adhesive residue, and any leftover product. Use warm, soapy water and a sponge to scrub the surface. Rinse well and let it dry completely. If there are stubborn glue spots, gently sand them away with fine-grit sandpaper until the base is smooth and ready for paint or wrapping. A smooth surface ensures your Japanese Kokeshi Doll will have even paint and a professional finish.
If you’re using a cardboard tube (like from paper towels), reinforce it by wrapping a strip of masking tape around the inside and outside. This adds rigidity and prevents crushing when you attach the head. Whether plastic or cardboard, your base should feel sturdy in hand and free of bumps or cracks.
Shaping and Attaching the Head
The head is the soul of a Kokeshi Doll, with its gentle, round shape and serene expression. For the head, repurpose a small plastic half-golf ball, a wooden craft bead, or even the rounded top of a small container. If your chosen item has a seam, sand it lightly until it’s perfectly smooth.
To attach the head, use a hot-glue gun or a strong craft adhesive. Apply a ring of glue around the top opening of the body base, then press the head piece firmly in place. Hold for 10–15 seconds to set. Wrap masking tape gently around the joint to reinforce the connection, then cover the tape with a thin layer of air-dry clay or paper-mâché paste. Smooth the transition so it looks like one continuous piece.
Let the clay or paste dry completely—this may take 1–2 hours, depending on thickness. Once dry, lightly sand any rough spots. Your doll now has a unified silhouette, ready for sculpted details and painting.
Sculpting Facial Features and Kimono Folds
A true Kokeshi Doll expresses personality through subtle features. Use small bits of air-dry clay to sculpt a tiny nose at the center front of the head. Press gently with a toothpick to shape the nostrils and the forehead. For a simple ear or a bun knot hairstyle, roll mini-snakes of clay and attach them on either side or the top of the head. Smooth edges with a damp fingertip or a small sculpting tool.
Next, accentuate the body with kimono folds. Pinch or sculpt two vertical lines from the shoulder to the waist, mimicking the overlap of a kimono front. You can also add an obi (sash) at the midsection by wrapping a thin strip of scrap fabric or layering a contrasting paint band. Let all clay details dry thoroughly before moving on to painting.
Priming and Base Painting
Once your sculpted features are dry and sanded, it’s time to prime. Apply a thin coat of white acrylic paint over the entire doll—head, body, and all details. This prime coat unifies the surface and helps subsequent colors appear bright and true. Let the primer dry for at least 30 minutes.
After priming, paint the “skin” tone on the head using a flesh-colored acrylic or mix white with a hint of red and yellow. Use a fine-tip brush to avoid streaks. For the body, choose a traditional kimono base color—rich red, deep indigo, or forest green. Paint two even coats, letting each dry before applying the next. The result should be a smooth, saturated backdrop for your decorative motifs.
Hand-Painting the Face: Eyes, Mouth, and Cheeks
The face of a Kokeshi Doll is delightfully simple yet expressive. With a size-0 fine brush, paint two short black strokes for closed eyes about one-third down from the top of the head. Keep them slightly angled and gently curved to evoke serenity. Below each eye, add a tiny dot of pink or peach paint to suggest rosy cheeks.
For the mouth, paint a small horizontal line in red or dark pink—just a few millimeters wide. The expression should be calm and friendly. If you’d like to add eyebrows, use two faint brackets above the eyes in black or dark brown. Avoid heavy lines; Kokeshi features are meant to be minimalist and elegant.
Creating Traditional Floral and Geometric Motifs
What makes each Kokeshi Doll unique is the hand-painted patterns on the kimono. Research traditional motifs—chrysanthemums, cherry blossoms, maple leaves, or geometric stripes—and sketch them lightly with a pencil. Using size-2 brushes, fill in petals with white or pink, then outline and add dots in contrasting colors like yellow or gold.
For geometric styles, paint bold stripes or checkered grids in two alternating colors. Some regional Kokeshi feature repeated chevrons, spirals, or concentric circles. Don’t worry about perfect symmetry; slight variations highlight the handmade charm. After painting each motif, let it dry fully before adding accents or outlines.
Adding Final Details and Sealing
Once all paint is dry, consider adding tiny embellishments: a bead or button as a hairpin, a small paper fan glued to one side, or a kimono collar made from origami paper. These little flourishes bring personality and depth to your Japanese Kokeshi Doll.
To protect your masterpiece, spray or brush on a clear acrylic varnish or sealant. Choose a matte or satin finish for a traditional look, or gloss if you prefer a shiny surface. Apply two light coats, allowing each to dry completely (usually 30 minutes per coat). The sealant locks in paint, repels dust, and makes your doll durable enough to display or gift.
Teaching Sustainability and Cultural Appreciation
This DIY project does more than produce a beautiful doll. It fosters sustainability by giving new life to recycled materials and reducing reliance on store-bought crafts. As you work, discuss with children or students the importance of upcycling and how small choices can make a big environmental impact. Simultaneously, you open a gateway to Japanese culture, exploring the history of Kokeshi dolls, the meaning of floral motifs, and the significance of traditional craftsmanship.
Encourage learners to share what they discover: maybe a story behind the chrysanthemum, the seasonal practice of felling wood in Tōhoku, or how Kokeshi represent wishes for health and happiness. This cross-cultural exchange builds empathy, curiosity, and global awareness—all through the simple act of crafting.
Troubleshooting Common Challenges
Even seasoned crafters hit snags. If your roll-on bottle has an uneven surface, smooth it with putty or an extra layer of paper-mâché. Paint bubbling? Sand lightly between coats and ensure each layer dries fully. Struggling with tiny facial details? Practice on scrap wood or paper first, then transfer your confidence to the doll’s head. Remember, slight imperfections add character—they prove it’s handmade.
If the head wobbles, reinforce the joint by adding more clay inside and around the neck, then carve away excess after drying. For peeling paint, check that the surface is clean and primed, and apply thinner coats more gradually. Each setback is an opportunity to debug your process, just like in programming—tweak, test, and improve.
Displaying and Gifting Your Kokeshi Creation
Once finished, your Japanese Kokeshi Doll deserves a special place. Create a small wooden or cardboard pedestal covered in washi paper to elevate the doll. Write a card explaining the cultural significance and the eco-friendly materials used. Kokeshi dolls make heartfelt gifts for birthdays, housewarmings, or teacher appreciation—symbols of good fortune and resilience.
For collectors, consider making a series in different styles—Naruko, Tsuchiyu, Gosho—each with distinct painting techniques. Arrange them on a floating shelf with tiny plaques describing their origins. This custom display transforms your home into a mini-gallery of cross-cultural crafts and environmental stewardship.
Conclusion: Crafting Culture and Sustainability
By crafting a Japanese Kokeshi Doll from recycled materials, you’ve woven together the threads of tradition, sustainability, and creativity. You’ve honored the spirit of Tōhoku artisans while giving new purpose to everyday waste. More than a decorative item, your doll represents a journey—through history, across oceans, and into mindful making.
Whether you’re a parent guiding a child’s first craft or an adult seeking a meditative weekend project, this tutorial shows that meaningful art can arise from humble beginnings. So gather those recycled bits, channel your inner artisan, and paint a story of your own. Your Kokeshi Doll awaits—and with it, the pride of building something beautiful, sustainable, and deeply cultural.

I’m a longtime enthusiast of creative play and creative magic. I’m passionate about transforming everyday materials into extraordinary fun. I explore, test, and refine each project, ensuring it sparks joy, fuels imagination, and is delightfully achievable for families and educators. Driven by the belief that the best toys often come from imagination. I love empowering others to create playful memories.