
Discover the best sensory bottles for kids’ relaxation. Simple DIY ideas to help children stay calm, focused, and stress-free.
Children thrive on exploration and play, but modern life often comes with overstimulation—bright screens, noisy environments, and busy schedules. In these moments, helping kids slow down and find calm is essential for their emotional well-being. Among the many mindfulness tools available, sensory bottles stand out for their simplicity, accessibility, and effectiveness.
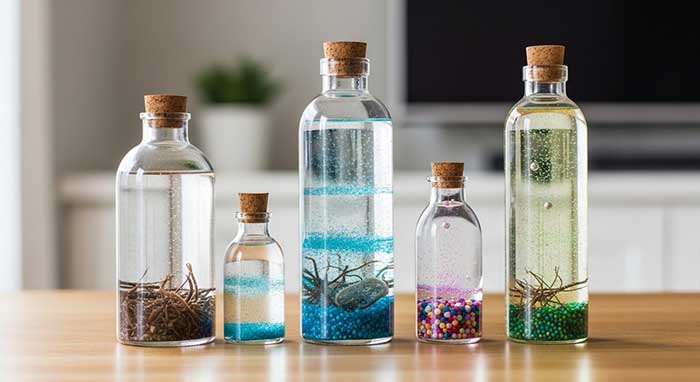
These clear, sealed bottles filled with moving elements like glitter, beads, or natural materials create a mesmerizing visual experience that engages a child’s senses while encouraging relaxation. Whether purchased or made at home, sensory bottles are easy to incorporate into daily routines for moments of stress relief, focus, or quiet play.
What Are Sensory Bottles?
A sensory bottle (also known as a calm-down jar or discovery bottle) is a container—usually plastic for safety—filled with various elements that move when shaken or tilted. Watching the contents swirl, fall, and settle helps children naturally shift their attention away from stress and toward something soothing and predictable.
They are widely used by:
- Parents for home relaxation routines
- Teachers in classroom calm-down corners
- Therapists working with children on emotional regulation
- Caregivers supporting children with sensory processing challenges
Why Sensory Bottles Are Effective for Relaxation
1. Visual Engagement
The slow movement of glitter or beads captivates attention, creating a mindful moment where children focus only on what’s happening inside the bottle.
2. Sensory Feedback
Shaking, turning, or holding the bottle gives children safe tactile input. This can help release nervous energy without disruptive behaviors.
3. Emotional Regulation
For children who experience anxiety, frustration, or overstimulation, sensory bottles offer a physical and visual cue to pause, breathe, and regain control.
4. Accessibility for All Ages
From toddlers to older children (and even adults), sensory bottles are non-verbal, easy to use, and portable, making them ideal for any environment.
Materials Needed for DIY Sensory Bottles
Creating your own sensory bottles gives you full control over the theme, colors, and level of complexity. Here are basic materials to start:
- Clear plastic bottle or jar (to prevent breakage)
- Sealing materials (hot glue or duct tape to secure lids)
- Liquid fillers such as water, baby oil, or clear glue
- Visual elements like glitter, sequins, beads, sand, or small toys
- Optional extras: food coloring, glow-in-the-dark paint, natural materials (leaves, shells, or flowers)
7 Sensory Bottle Variations for Relaxing Playtime
1. Glitter Calm-Down Bottle
Best For: Visual relaxation and deep breathing.
How to Make:
- Fill the bottle halfway with warm water and add clear glue or glycerin
- Pour in fine and chunky glitter for depth
- Seal the lid and shake to mix.
Relaxation Use: Encourage children to watch the glitter settle as they take slow breaths, using it as a mini meditation session.
2. Ocean-Themed Bottle
Best For: Imaginative play and soothing visuals.
How to Make:
- Fill 2/3 of the bottle with water dyed blue with food coloring.
- Add seashells, blue beads, or fish-shaped charms.
- Seal and shake gently for a wave effect.
Tip: Pair with ocean soundscapes or soft music for bedtime or quiet play.
3. Oil-and-Water Lava Bottle
Best For: Fascinating science-based relaxation.
How to Make:
- Fill one-third of the bottle with colored water and two-thirds with baby oil or mineral oil.
- Optionally add a few effervescent tablets for bubble movement (use with supervision).
Tip: Great for teaching about liquid density while providing calming entertainment.
4. Nature Discovery Bottle
Best For: Nature connection and mindfulness.
How to Make:
- Collect small leaves, flower petals, or pebbles during a nature walk.
- Place them inside the bottle and fill with water.
- Optionally add biodegradable glitter for a magical touch.
Tip: Use as a transitional tool when moving from outdoor play to quiet indoor time.
5. Color Mixing Bottle
Best For: Educational relaxation and color recognition.
How to Make:
- Add two primary colors (e.g., blue and yellow) with water.
- Have kids shake to see the new color form (green in this case).
Tip: Use it as a calming science experiment and a fun teaching moment about colors.
6. Sensory Bead Bottle
Best For: Gentle sound and texture.
How to Make:
- Pre-soak water beads and fill the bottle halfway with them.
- Add clear water to fill the rest.
- Shake gently to see beads bounce and move in slow motion.
Tip: Rolling the bottle slowly can be as soothing as watching glitter settle.
7. Glow-in-the-Dark Bottle
Best For: Nighttime comfort and relaxation.
How to Make:
- Use glow-in-the-dark paint or small glow sticks inside water.
- Charge under light, then watch it glow in a dim room.
Tip: Perfect for bedtime routines to ease anxiety before sleep.
Beyond DIY: Store-Bought Sensory Bottles
For those who prefer pre-made options, several companies sell high-quality sensory bottles:
- Petit Boum: Known for eco-friendly designs and vibrant colors.
- MindWare Sensory Fidgets: Offers themed bottles for different moods.
- B. Toys by Battat: Affordable and widely available.
These options are great for busy families or schools needing durable and safe designs.
How to Use Sensory Bottles Effectively
At Home
- Place bottles in a calm-down corner with soft pillows and quiet music.
- Encourage their use during transitions, like before bedtime or after school.
In Classrooms
- Teachers can use them as non-disruptive focus tools.
- Include sensory bottles in mindfulness lessons or emotion regulation workshops.
On the Go
- Keep small sensory bottles in the car for long trips or waiting rooms to reduce anxiety.
Tips for Parents and Teachers
- Set an Intention: Teach children to use bottles as a signal to pause and take three slow breaths.
- Create a Routine: Use sensory bottles at the same time each day for emotional check-ins.
- Combine With Other Tools: Pair with breathing exercises, soft music, or weighted lap pads for deeper relaxation.
- Ensure Safety: Always seal lids and check bottles regularly for leaks, especially with younger children.
Therapeutic Applications
Sensory bottles are frequently used in:
- Occupational Therapy: For children with sensory processing disorder or autism spectrum challenges.
- Speech Therapy: As visual reinforcements for calming before sessions.
- Emotional Therapy: Helping children identify and manage big emotions in a safe, nonverbal way.
Why DIY Sensory Bottles Are Special
Making sensory bottles together adds another dimension:
- Bonding Time: Crafting becomes a mindful activity for both parent and child.
- Personalization: You can tailor colors and themes to your child’s favorite interests (space, animals, seasons).
- Sustainability: Using recycled bottles teaches eco-consciousness.
Wrapping It All Up
Sensory bottles are a small but powerful tool for mindfulness and relaxation. Whether it’s a simple glitter bottle, an ocean-themed version, or a glow-in-the-dark comfort tool, these bottles help children slow down, focus, and manage their emotions.
Making them at home also becomes a mindfulness activity in itself, creating moments of calm and connection before the bottle is even finished. With just a few materials and creativity, any family or classroom can benefit from these versatile tools.

I’m a longtime enthusiast of creative play and creative magic. I’m passionate about transforming everyday materials into extraordinary fun. I explore, test, and refine each project, ensuring it sparks joy, fuels imagination, and is delightfully achievable for families and educators. Driven by the belief that the best toys often come from imagination. I love empowering others to create playful memories.